TL;DR
Placing your AI rig in another room, especially a closet with ventilation, beats any foam treatment in noise reduction. Proper placement and airflow are key to keeping it cool and quiet without sacrificing performance.
Think your noisy AI rig is just part of the setup? Think again. The most effective way to quiet a loud machine isn’t more foam or soundproofing — it’s moving it out of your space entirely. A rig tucked away in another room or closet can be whisper-quiet, even with minimal treatment. The most effective way to quiet a loud machine isn’t more foam or soundproofing — it’s moving it out of your space entirely. A rig tucked away in another room or closet can be whisper-quiet, even with minimal treatment.
This guide reveals how to make that happen without overheating. You’ll learn the top placement tricks, treatment essentials, and the one thing most overlook — ventilation. For tips on creating an optimal home gym setup, see Acoustic Dampening, Placement, and the “Rig in the Closet” Setup. You’ll learn the top placement tricks, treatment essentials, and the one thing most overlook — ventilation. Ready to turn your noisy workspace into a peaceful zone? Let’s get started.
Acoustic dampening
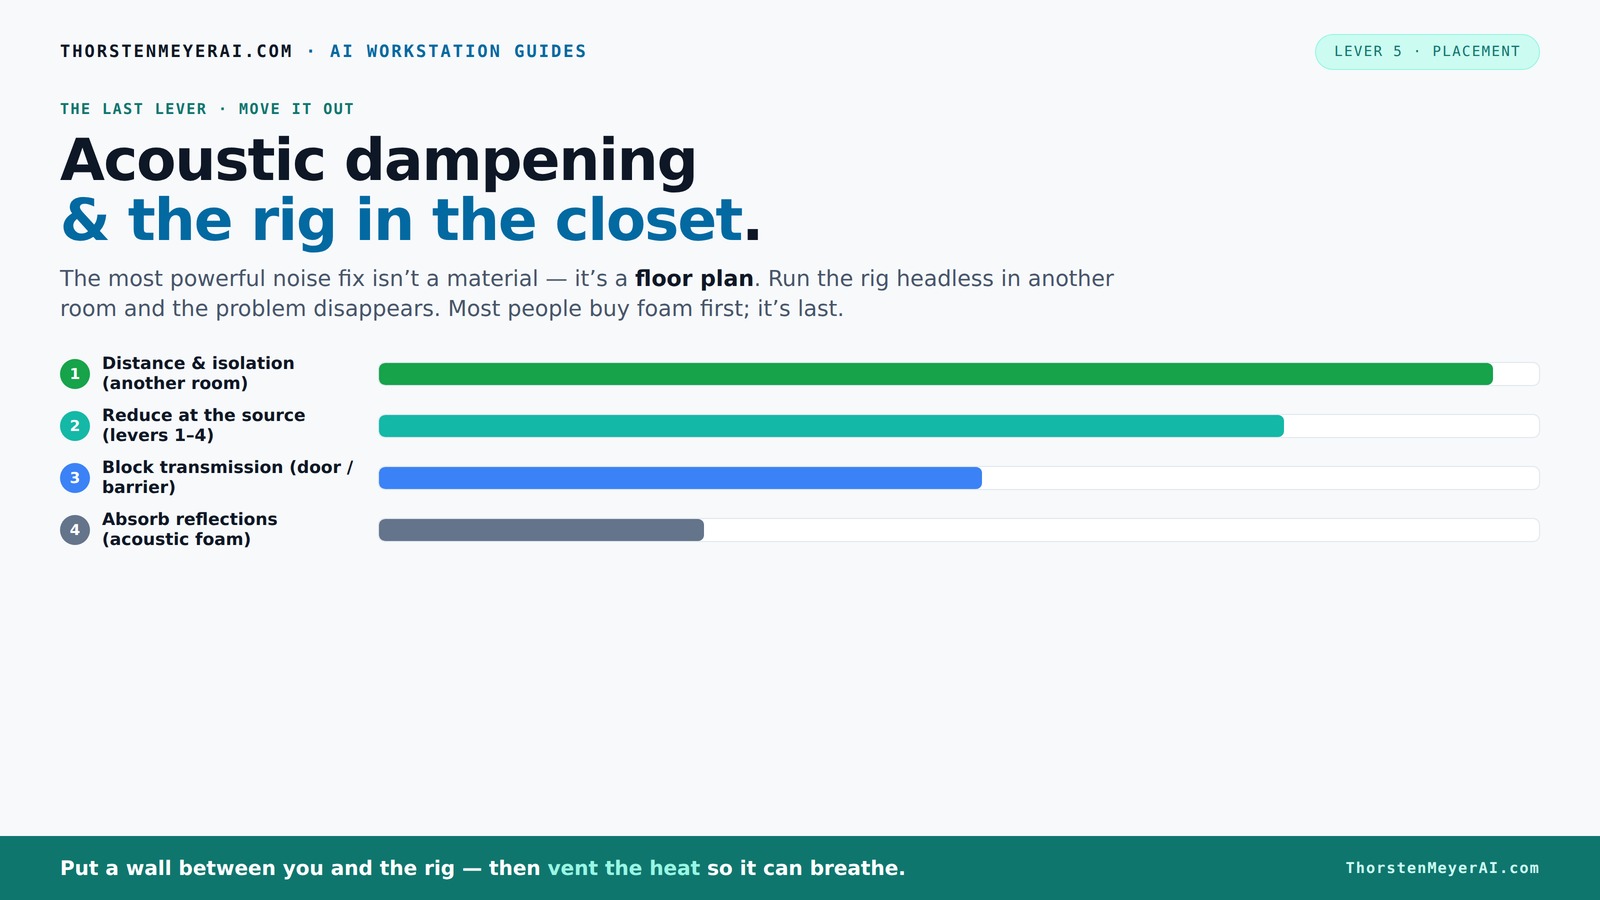
& the rig in the closet.
The most powerful noise fix isn’t a material — it’s a floor plan. A rig you can’t hear because it’s in another room beats any amount of foam. Tap the approaches in Part 1 to see what actually works.
(another room)
(levers 1–4)
(door / barrier)
(acoustic foam)
Contain the noise, not the heat
Key Takeaways
- Moving your rig into another room or closet with proper ventilation is more effective than any foam or treatment.
- Ensure your enclosed space has airflow — use active ventilation or ducting to prevent overheating.
- Placement of the microphone and treatment points matters more than multiple layers of foam.
- Seal gaps around doors and windows to prevent sound leaks.
- Layer acoustic treatments—foam, blankets, bass traps—for the best small-room sound.

Art3d 4-Pack 47x23.6 Inch Acoustic Panels with Wood Slat Design - Soundproof Wall Panel for Office, Gaming Room & Studio, Ideal for Streamers, Home Workers & Recent Movers, Deep Walnut
【Clatter vs. Atter】Say goodbye to ringing rooms. This 4-pack of 47×23.6 inch (a total of 30.8 Sq.ft) panel...
As an affiliate, we earn on qualifying purchases.
As an affiliate, we earn on qualifying purchases.
Why Distance Outperforms Foam — The #1 Noise Fix You Can Do
Moving your rig far away from your desk is by far the most effective noise reduction. When a machine lives in another room, the sound levels drop dramatically — often by 20-30 dB. That’s like turning down the volume on a loud TV with just a flick of a switch.
Imagine working in a quiet home office while your GPU runs in the basement. The noise barely filters through the walls. It’s not about absorbing sound; it’s about removing the source from your ears entirely.
This is especially true for AI workstations, which often generate constant heat and noise. Your laptop or desktop becomes a portal to the rig, not a direct connection. The result? Your workspace stays silent, and the rig can roar without disturbing anyone.
However, this approach requires considering the tradeoff: you'll need longer cable runs and possibly more complex setup logistics. But the payoff—peaceful, quiet work—is often worth the effort, especially if noise is a significant distraction or disturbance.

TERRAMASTER D4-320 External Hard Drive Enclosure - 4bay USB 3.2 Gen2 10Gbps Type-C USB Storage Hot Swappable Plug and Play (Diskless)
High-Speed Data Transmission: The D4-320 hard drive enclosure (a DAS, NOT a NAS) utilizes the USB 3.2 Gen2...
As an affiliate, we earn on qualifying purchases.
As an affiliate, we earn on qualifying purchases.
The 'Rig in the Closet' Trick — How to Do It Right and Why It Matters
Putting your rig in a closet or cabinet sounds perfect — until it isn’t. The main snag? Heat. A sealed space traps heat, risking thermal throttling and hardware damage. That’s a nightmare for a 24/7 AI rig.
To pull this off effectively, it’s essential to understand the tradeoffs involved. Sealing the space completely enhances soundproofing but can lead to overheating if not managed properly. That’s why the key is balancing sound insulation with effective cooling strategies. For more on acoustic treatment techniques, visit our guide on acoustic dampening and placement.
To do it right:
- Install active ventilation — a quiet exhaust fan or ducting to pull hot air out. This prevents heat from building up, maintaining safe operating temperatures.
- Use a vented cabinet or add a small intake vent to keep air flowing. Proper airflow ensures the hardware stays cool even during intensive tasks.
- Consider temperature-controlled exhaust fans or built-in soundproof cabinets with cooling features. These solutions help manage heat without sacrificing soundproofing.
For example, a popular DIY trick is to line a closet with acoustic foam while installing a ducted fan. This muffles noise and keeps the hardware cool, but only if you provide adequate airflow. Without ventilation, the heat can cause throttling, reducing performance and risking hardware failure. The tradeoff is clear: effective noise reduction requires careful planning around cooling.

AC Infinity Passive Ventilation Grille 17", White, for PC Computer AV Electronic Equipment Cabinets, Rooms, and Closets
Designed to be installed into doors, cabinets, and walls to help increase ventilation.
As an affiliate, we earn on qualifying purchases.
As an affiliate, we earn on qualifying purchases.
Acoustic Treatment vs. Placement — What Matters Most?
Acoustic dampening and placement aren’t the same. Treatment involves lining walls with foam, panels, or blankets. Placement is about where you put your rig and microphone to minimize reflections and echo.
In small rooms, reflections bounce everywhere, creating a boxy, harsh sound. Covering walls with acoustic panels helps reduce this, but it’s secondary to where you position your gear.
For example, placing the mic at the room’s reflection point—about a foot away from the wall—can dramatically improve sound clarity. Meanwhile, mounting foam on the ceiling and walls reduces reverb, making recordings cleaner and less echoey.
Why does this matter? Because improper placement can negate the benefits of treatment. If your mic is too close to a reflective surface, or if your gear is positioned where sound bounces directly into the mic, your recordings will suffer regardless of treatment. Prioritizing placement allows you to achieve cleaner sound with less material, saving money and space.

18 Pack Black Acoustic Panels 12"X12"X 0.4"Sound Absorbing Panel Wall Decoration Soundproof Wall Panels High-Density Sound Deadening Panels Acoustic Treatment Panel For Home Studio
[Material Safety] The wall sound proof panels is made of polyester fiber, which has better ductility and wear...
As an affiliate, we earn on qualifying purchases.
As an affiliate, we earn on qualifying purchases.
How to Properly Place Your Microphone and Gear in a Closet Setup
Your microphone’s position is critical in a small space. The best spot? About 6-12 inches from your mouth, angled to avoid reflections from the closet walls.
Use a small stand or boom arm to keep it stable and away from reflective surfaces. For example, a foam panel behind the mic helps absorb direct reflections, reducing echo.
Additionally, consider the room’s corners, where bass frequencies tend to accumulate. Placing bass traps or thick foam panels in these spots can tame low-frequency muddiness, resulting in clearer recordings. Proper placement minimizes unwanted reflections and resonances, which are common pitfalls in small, enclosed spaces. This means less post-processing and more professional-sounding recordings from your tiny setup. To learn more about optimizing your space, check out this detailed guide on acoustic setup.
Sealing Doors and Openings — Stop Sound Leaks in Their Tracks
The door is a major weak point in soundproofing a closet or small room. Gaps and cracks let sound escape or enter, ruining your efforts.
Seal gaps with weatherstripping or acoustic door sweeps. For example, a thick blanket or specialized door seal can reduce sound leaks by 80% or more. But beyond sealing, understanding why gaps are problematic helps you prioritize effective solutions. Small cracks can significantly undermine your soundproofing efforts, especially in tight spaces where even minor leaks carry a lot of sound energy.
In practice, a simple DIY fix is to hang a dense quilt or sound blanket over the door, and seal around the edges with draft stoppers or foam strips. This not only improves soundproofing but also prevents air leaks, which can cause temperature fluctuations. Proper sealing enhances both acoustic isolation and climate control, making your setup more efficient and quieter. For additional tips on creating a peaceful environment, visit our site about nurturing mental and physical well-being.
Corners & Bass Traps — Tackle Low-Frequency Headaches
Corners are the natural bass traps of small rooms. Low frequencies tend to build up, creating boomy, muddy sound — especially in tiny closets.
Installing bass traps in the corners can absorb these lows. For instance, 4-inch thick mineral wool panels in each corner can cut bass buildup by 50% or more. This is crucial because low frequencies are difficult to control and can cause significant coloration of your sound. Without proper treatment, recordings and monitoring can sound uneven or boomy, reducing clarity and accuracy.
If you notice your recordings sound boomy or your monitor’s bass is uneven, adding bass traps is a smart move. They’re a game-changer for small, reflective spaces, helping to produce a flatter, more balanced sound profile and clearer audio reproduction.
Floor Treatments — Do Rugs Really Help?
Hard floors reflect sound, bouncing reflections back into your mic. A simple rug or carpet can absorb much of that, softening the room’s sound and reducing footstep noise.
For example, a 5x7 shag rug in front of your mic reduces echo and foot noise, making your recordings more direct and clear. It’s a cheap and effective upgrade that also adds comfort and warmth to your space.
In very small spaces, every bit of absorption helps. Combining a rug with wall treatment and door sealing creates a more controlled acoustic environment, leading to cleaner recordings and less post-processing time.
Layered Treatment Approaches — How Much Is Enough?
Most DIY setups work best with layered solutions. Combining blankets, foam panels, door seals, and bass traps creates a balanced sound environment tailored to your space.
Start with the reflection points—cover walls, ceiling, and door with foam or blankets—and then add bass traps in corners for low-frequency control. Sealing gaps around doors and windows enhances overall isolation. This incremental approach allows you to adapt your setup based on testing and listening, ensuring you don’t over- or under-treat your space. It’s about finding the right balance between absorption, reflection control, and soundproofing to achieve the best possible recording quality within your budget and space constraints.
When You Need More Than a Closet — Knowing Your Limits
Sometimes a closet isn’t enough. If you still get echo or sound leakage despite your efforts, consider upgrading to a dedicated vocal booth or a larger room with better acoustic design.
For example, a small vocal booth with built-in soundproofing can be a game-changer for singers and voice-over artists, providing a controlled environment for high-quality recordings. However, such solutions require careful planning around ventilation and acoustic treatment to prevent heat buildup and echo. Recognizing your space limitations and understanding when to invest in a dedicated room can save frustration and improve your recording quality significantly. It’s about matching your needs with the right environment to ensure your audio is as clear and professional as possible.
Frequently Asked Questions
Can a closet really be turned into a usable vocal booth or mini studio?
Yes, a closet can work as a vocal booth or tiny studio if you treat it properly. Focus on reducing reflections with foam or blankets, sealing gaps, and adding bass traps for low frequencies. Ventilation is crucial to prevent heat buildup, especially with long sessions.
What is the difference between soundproofing and acoustic treatment?
Soundproofing stops sound from entering or leaving a space, often requiring heavy barriers, insulation, or sealing. Acoustic treatment improves sound quality inside a room by reducing echo, reflections, and reverb, mainly through panels and absorbers.
Where should I place the microphone in a closet setup?
Place the mic about 6-12 inches from your mouth, angled to avoid reflections from the closet walls. Positioning the mic away from reflective surfaces and adding a foam panel behind it helps capture cleaner sound with less echo.
How much foam or panel coverage do I need?
Start with covering reflection points—walls, ceiling, and door—using enough panels or blankets to dampen echoes. For small rooms, 20-30% coverage is often enough, but add more if you notice echo or low-frequency issues.
Do I need bass traps in such a small space?
Yes, especially if you notice boomy lows or uneven bass. Installing bass traps in corners can significantly improve sound clarity and reduce muddiness, making your recordings tighter and more professional.
Conclusion
Quiet, cool, and out of sight — that’s the power of placing your AI rig in a closet with the right setup. It’s a simple shift that makes a huge difference in your work environment.
Remember, the key isn’t just absorbing sound but managing heat and noise at the source and through smart placement. A little effort now saves you headaches—and noise—down the line. Your workspace will thank you.