
To prepare your sauna foundation, start by choosing a stable, level site, then excavate and lay a moisture barrier, such as a waterproof membrane, to prevent water damage. Add rigid foam insulation under a concrete slab or layer it beneath a wood floor, ensuring proper drainage with a slight slope. Carefully select moisture-resistant flooring materials like treated wood, tile, or concrete, and consider how insulation and barriers work together for durability—more tips await to help you get it just right.
Key Takeaways
- Ensure a level, stable foundation using concrete, treated wood, or suitable materials to prevent shifting over time.
- Install proper insulation around the foundation to regulate internal temperature and improve energy efficiency.
- Place moisture barriers, such as vapor retarders or waterproof membranes, underneath flooring to prevent water intrusion.
- Select durable, moisture-resistant flooring materials like concrete slabs, pressure-treated wood, or tile, with proper drainage slope.
- Layer insulation and moisture barriers correctly beneath the foundation to protect against moisture damage and maintain stability.
Before installing your sauna, it’s essential to prepare a solid foundation and proper flooring to guarantee safety and longevity. A stable base not only prevents shifting or settling over time but also ensures your sauna remains secure and functional. When planning your foundation, consider the insulation requirements of your space. Proper insulation helps regulate temperature and enhances energy efficiency, making your sauna more comfortable and cost-effective to operate. Insulation should be installed around the foundation to minimize heat loss and maintain consistent internal temperatures. This is especially important if your sauna is outdoors or in a climate with significant temperature fluctuations.
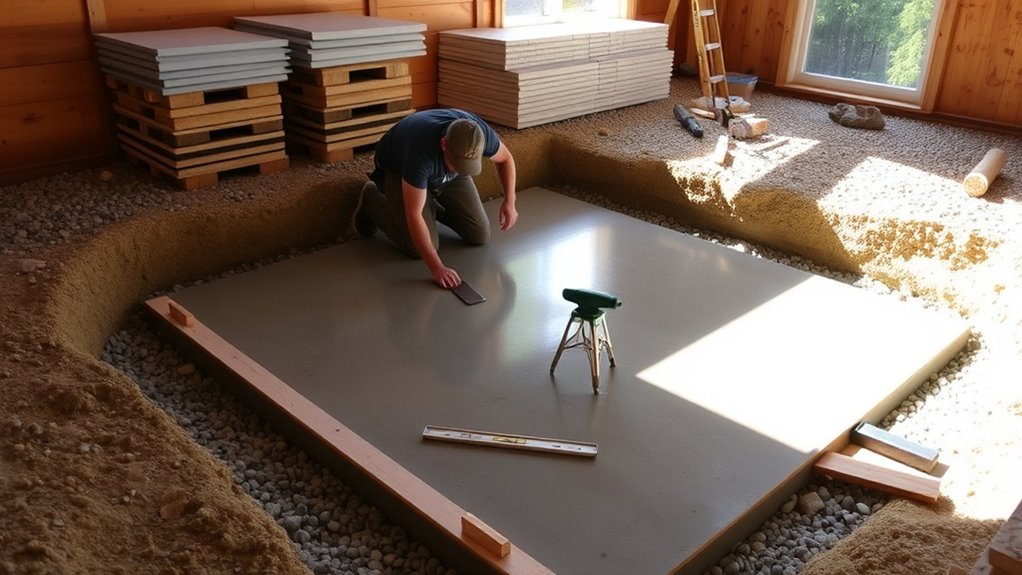
Equally important is the installation of moisture barriers. Bathrooms, basements, or outdoor locations expose the foundation to high humidity and potential water intrusion. Moisture barriers act as a protective layer that prevents water from seeping into the foundation, which can cause damage over time. When laying your foundation, ensure that moisture barriers—such as vapor retarders or waterproof membranes—are properly placed underneath the flooring material. This step is crucial to avoid mold, wood rot, and structural deterioration, which could compromise the safety and integrity of your sauna.
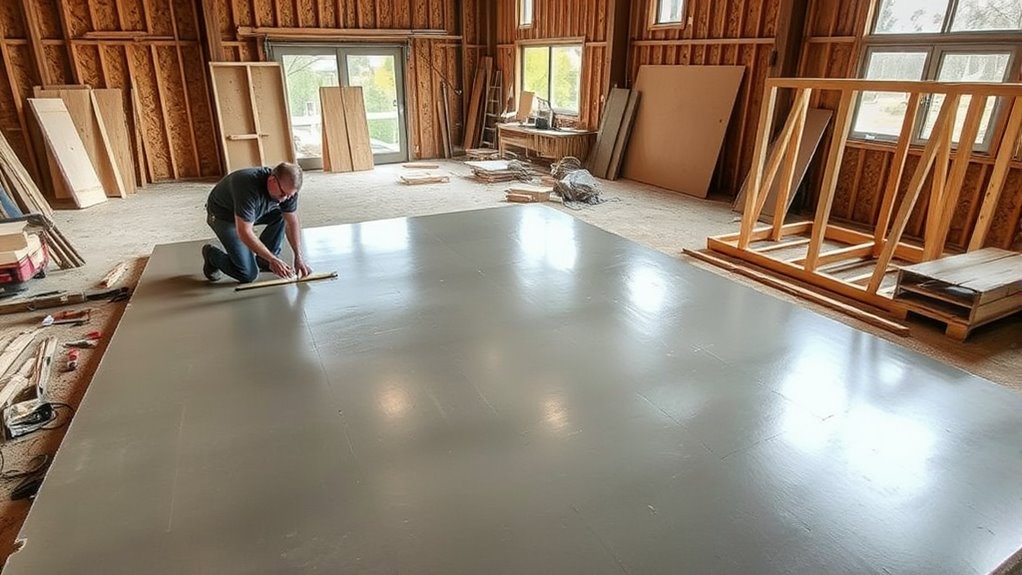
Choosing the right flooring material is a key part of your preparation. You want a surface that’s durable, moisture-resistant, and easy to maintain. Popular options include concrete slabs, pressure-treated wood, or tile, all of which can handle moisture and heavy use. If you opt for wood, make sure it’s suitable for damp environments and treated to resist decay. When installing the flooring, incorporate a slight slope towards a drainage point if your sauna is in an area prone to water runoff or spillover. This prevents water pooling and further protects the foundation.
Remember to combine insulation requirements with moisture barriers seamlessly. For example, if you’re installing a concrete slab, add rigid foam insulation beneath it and then lay a moisture barrier over the insulation before pouring the concrete. This combination ensures that your foundation stays dry, insulated, and well-protected from temperature shifts. Additionally, considering the type of foundation can significantly impact the durability and stability of your sauna, especially in areas with challenging soil conditions. Properly preparing your foundation and flooring isn’t just about safety; it’s about creating a sturdy, long-lasting base that keeps your sauna functioning well for years. Taking these steps now will save you time and money down the road, ensuring your sauna remains a cozy and safe retreat.
Top picks for "prepar foundation floor"
Open Amazon search results for this keyword.
As an affiliate, we earn on qualifying purchases.
Frequently Asked Questions
What Are the Best Moisture Barriers for Sauna Flooring?
You should choose moisture barrier types like polyethylene plastic sheeting or vapor barriers designed for high humidity environments. These options provide excellent flooring protection by preventing moisture from seeping into the subfloor, which can cause damage over time. Make certain the moisture barrier is thick enough to withstand sauna conditions and is properly sealed at the edges. Using the right moisture barrier helps maintain a durable, safe, and well-protected sauna flooring.
How Thick Should the Foundation Concrete Be?
You should pour a concrete foundation that’s at least 4 inches thick, ensuring proper concrete curing for durability. Reinforce the foundation with steel rebar to prevent cracking and provide stability for your sauna. Thicker concrete, around 6 inches, is advisable for heavier structures or uneven ground. Remember, thorough curing and reinforcement are essential to create a solid, long-lasting base that supports your sauna’s weight and moisture exposure.
Can I Install the Sauna on an Existing Deck?
You can install a sauna on an existing deck—if you guarantee deck stability and material compatibility. Imagine your deck as a sturdy stage, ready to support the heat and humidity of the sauna. Check that the deck’s structure can handle the weight and that the materials won’t warp or degrade. Reinforce if needed, and use proper insulation. With careful preparation, your deck becomes the perfect foundation for your new sauna.
What Insulation Materials Are Recommended Under the Floor?
You should use rigid foam insulation or mineral wool for under the floor, as they provide excellent insulation types and moisture control. Rigid foam is lightweight, durable, and resists moisture, making it ideal for sauna environments. Mineral wool offers superior thermal insulation and moisture resistance, helping prevent mold and rot. Both options guarantee your sauna stays warm and dry, creating a comfortable, long-lasting space.
How Do I Ensure Proper Drainage for the Sauna Floor?
You can’t let water turn your sauna floor into a swamp! To guarantee proper drainage, install a reliable drainage system and make sure your floor has a gentle slope—about 1-2%—so water flows effortlessly toward the drain. Double-check that the slope is consistent across the entire floor. This way, you’ll keep your sauna dry, safe, and ready for relaxing sessions without any puddles or water damage.
Conclusion
By taking these careful steps to prepare the foundation and flooring, you set the stage for a durable, safe sauna. Remember, a solid base isn’t just the beginning—it’s the heartbeat of your sauna’s longevity. With each layer you lay, you build more than just a structure; you create a sanctuary for relaxation. So, invest your effort now, and enjoy the warm embrace of a perfectly grounded sauna for years to come.